- So far we've created an object that only moves in a straight line.
- This foundation can easily be extended.
- Suppose, for example, we want to change our object's speed or direction.
- Remember that velocity is a speed with a direction, so a change to the object's speed or direction is a change to the object's velocity.
- To describe a change in velocity, we use another basic physics concept, acceleration.
- Acceleration is the rate at which an object changes velocity.
- In other words, acceleration describes how much an object's velocity will change during a given amount of time:
acceleration = change in velocity / time
- The "change in velocity" is described as a vector, with a magnitude and a direction.
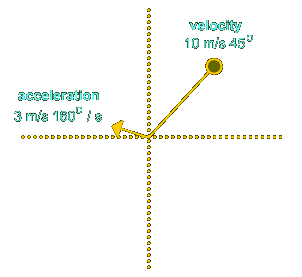
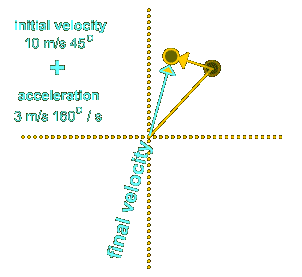
- For example, suppose an object has an initial velocity of 10 meters per second at a 45 degree angle.
- Every second, the object changes velocity by 3 meters per second at a 160 degree angle.
- After one second passes, how do we determine the position of the object?
- We add the velocity vector and the acceleration vector together.
- Easy enough to understand in a diagram, but how do we translate adding vectors into something we can use in Flash?
- Remember how we found the horizontal and vertical components of a velocity vector:

vertical component = sin(direction) * magnitudehorizontal component = cos(direction) * magnitude- To add an acceleration vector to a velocity vector, we simply find the components of the acceleration vector and add them to the components of the velocity vector:
finalX = velX + accelX

finalY = velY + accelY
- We won't have time to walk through the code for movement with acceleration, but you can work through it on your own, below.
- Notice that the only changes are to the
moveClip() function.
- In this version of the code, we retrieve the acceleration vector magnitude and direction through text-field inputs.
- If we were to change those inputs to the arrow keys...bang, we'd have ourselves a spaceship!
// Initialize movement direction, speed, and start time.

function init () {

  velMagnitude = 30; // Total pixels to travel per second

  velDirection = 250; // Angle of object, measured

                    // counterclockwise from the positive x-axis


  lastX = 225; // Object's initial x-coordinate

  lastY = 200; // Object's initial y-coordinate


  // Convert angle to radians so we can

  // use it with Math.cos and Math.sin.

  var radians = degreesToRadians(velDirection);

  // Pixels to move horizontally each second

  moveX = Math.cos(radians) * velMagnitude;

  // Pixels to move vertically per second

  oveY = Math.sin(radians) * velMagnitude;


  // The current time

  now = getTimer();

}


// Function to move a clip with each passing frame.

function moveClip (theClip) {

  // Determine how much time has passed

  then = now;

  now = getTimer();

  elapsed = now - then;

  numSeconds = elapsed / 1000;


  // Set the acceleration vector based on input text fields

  accelMagnitude = isFinite(Number(accelMagnitudeInput)) ? Number(accelMagnitudeInput) : 0;  // Pixels of acceleration per second

  accelDirection = isFinite(Number(accelDirectionInput)) ? Number(accelDirectionInput) : 0;  // Angle of acceleration


  // Calculate the x and y components of the acceleration vector

  var radians = degreesToRadians(accelDirection);

  // Pixels to accelerate horizontally each second

  accelX = Math.cos(radians) * accelMagnitude;

  // Pixels to accelerate vertically per second

  accelY = Math.sin(radians) * accelMagnitude;


  // Determine the new horizontal location

  // of the clip, based on elapsed time and acceleration.

  moveX += accelX * numSeconds;

  newX = lastX + moveX * numSeconds;


  // Determine the new vertical location

  // of the clip, based on elapsed time and acceleration.

  moveY += accelY * numSeconds;

  newY = lastY - moveY * numSeconds;


  // Place the clip in the appropriate location.

  theClip._x = newX;

  theClip._y = newY;


  // Remember where we placed the clip for next time.

  lastX = newX;

  lastY = newY;

}


// Converts degrees to radians.

function degreesToRadians(degrees) {

  return (degrees/180) * Math.PI;

}