 |
29 May 2001
|
In Flash, a preloader is a code module that pauses a movie until
some required body of data has finished downloading, guaranteeing
the proper playback of the movie. For example, a preloader can
ensure that animation or sound has sufficiently buffered before
playing, or that a series of variables has loaded before being
manipulated and displayed. For each of these types of data, a
different technique is used to build the corresponding preloader.
Over the course of this article we'll look at those techniques,
starting with the simplest: a preloader for a single movie. Note
that the code examples in this article all use Flash 5 ActionScript
syntax.
Download the Samples
The preloader examples described in this article are available
for download
here. Note that the music player example has been extended to
provide a draggable playhead (not covered in this article).
Single-Movie Preloaders
A single Flash .swf file is a self-contained unit. Its
contents--graphics, sound, movie clips, buttons, and scripts--are
dispersed across the frames of its main timeline. By monitoring the
download progress of the main timeline's frames, we can prevent a
movie from playing before adequate content is available. When enough
frames have loaded, we play the movie. Follow these steps to create
a basic, single-movie preloader:
-
Create a new movie.
-
Add 100 frames to the default Layer 1 layer (you can
actually use any number greater than 15, but we'll stick to 100
for this example).
-
At frame 15 of the Layer 1 layer, add a blank keyframe
(Insert-->:Blank Keyframe)
-
Between frames 15 and 100 of the Layer 1 layer, add
keyframes with plenty of content (sound and bitmaps are nice and
bulky).
-
On the main timeline, create a new layer called
scripts.
-
On the main timeline, create a new layer called
labels.
-
At frame 4 of the labels layer, add a blank
keyframe.
-
Use Modify-->Frame to label the new keyframe
loading.
-
At frame 15 of the labels layer, add a blank
keyframe.
-
Label the new keyframe beginMovie.
-
At frame 5 of the scripts layer, add a blank keyframe,
and attach the following code to it: // Specify how many frames to load before playing.
var loadAmount = _totalframes;
// If the required number of frames have finished loading...
if (_framesloaded == loadAmount) {
// ...start the movie
gotoAndPlay("beginMovie");
} else {
// ...otherwise, go back and check load progress again.
gotoAndPlay("loading");
}
That's it, your preloader is done. Now you need to make sure it
works. To simulate movie download at various modem speeds we use a
testing tool called the Bandwidth Profiler, available in Test Movie
mode. Here's how to turn the Bandwidth Profiler on:
- While editing your movie, select Control-->Test Movie.
- In Test Movie mode, select View-->Bandwidth Profiler.
- Under the Debug menu, select the desired download rate.
- To simulate the download of a movie at that rate, select
View-->Show Streaming.
Keep an eye on the green bar at the top of the Bandwidth
Profiler. It shows the simulated download progress of the movie.
Notice that playback pauses at frame 4 while your movie loads. If
the delay is too long at the target speed, you should consider
splitting your movie into pieces. Add multiple preloaders to your
main movie timeline or separate your content into individual
.swf files which you load only as necessary (we'll cover
preloading multiple .swf files later). Note that the
Bandwidth Profiler can only be used to test single-movie preloaders;
it doesn't show the progress of loaded variables or XML, or movies
loaded via loadMovie().
To see several inventive examples of preloaders, visit
Colin's recently launched companion site for
ActionScript: The Definitive Guide. The book's trailer
movie uses eye candy (rotating 3-D orbs) as a preloader, while the
Flash site itself transforms loading bars into graphical elements
in a navigation menu. (Of course, Flash is required.)
Now that you've seen your preloader in action with the Bandwidth
Profiler, let's consider how it works by examining the code you
attached to frame 5. In its first statement, we create a variable,
loadAmount, that indicates how many frames we're going to
preload.
var loadAmount = _totalframes;
 |
|
|
|
A preloader can ensure
that animation or sound has sufficiently buffered before
playing, or that a series of variables has loaded before being
manipulated and displayed. |
|
|
|
In our example, we set loadAmount to
_totalframes, a built-in ActionScript property that stores
the number of frames in a movie clip or main timeline. By using
_totalframes, we keep our code generic--the number of
frames we want to preload is the number of frames in the timeline,
as determined by ActionScript.
However, we should remember that Flash streams content (it
can play a movie while it continues to load). It is often wise to
preload only part of a movie, allowing the rest to load while the
user is occupied watching the show. To preload only a portion of a
movie, we set loadAmount to some number less than
_totalframes. Use the Bandwidth Profiler to determine the
appropriate portion to preload at your site's target modem
speed.
Having decided how many frames to preload (in our case, all of
them), we next check whether that amount has finished downloading or
not. We compare the built-in property _framesloaded (which
tells us how many frames have loaded) with loadAmount
(which indicates how many frames must be loaded before the movie
plays):
if (_framesloaded == loadAmount) {
If the two values are equal, the required frames have loaded, so
we can start playing the movie:
gotoAndPlay("beginMovie");
But if the two values are not equal, the required frames have not
loaded, so we send the playhead back to the loading frame
(frame 4 in our example):
gotoAndPlay("loading");
There, the movie resumes play, and re-enters frame 5, where we
check how many frames have loaded again. The playhead, therefore, is
stuck in a timeline loop until the required number of frames have
loaded, at which point it safely proceeds to the beginMovie
frame. Simple, but effective.
Some notes about the technique:
-
Our preloader starts at frame 5 rather than frame 1 because
scripts on the first frame of a movie are very occasionally
skipped by the Flash player. Leaving some room before our
preloader also makes adding new content to the start of the movie
easier.
-
To perform our preload check less frequently we can add new
frames between frames 4 and 5. This might be handy if we're
playing a preload animation or sound that should terminate only at
a specific point.
-
We don't use the old-school ifFrameLoaded statement in
our preloader. That's been deprecated and is less flexible than
our code.
Low Tech: Preloading with Layer Load Order
Having just built a preloader that starts at frame 5, you might
be wondering what would happen if there were content on frames 1
through 4. If a frame is not fully loaded when Flash attempts to
render it, its contents are displayed one layer at a time as they
load. Layers load from either the bottom up or the top down,
depending on the load order set for the movie under
File-->Publish Settings-->Flash-->Load Order.
We can use this to our advantage to build a "pre-preloader". By
simply separating, say, a logo, onto individual layers, we can
create a basic animation that indicates initial load progress to the
user. In Figure 1, the letters in the word "moock" are each placed
on their own layer, resulting in the animation depicted in Figure
2.

Figure 1: Separating content
onto layers.
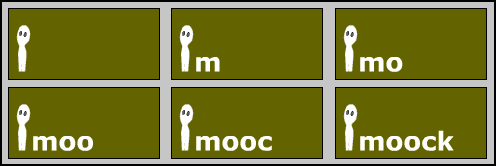
Figure 2: The progressive
display of content on layers.
A simple animation based on layer load order tells the user that
the movie has started downloading, but it doesn't indicate how long
they have left to wait. We'll learn how to do that next.
Displaying Load Progress
In our first attempt at a preloader, we successfully delayed the
playback of a movie until a specified number of frames had
downloaded. We'll now see how to show some signs of life to the user
while our movie loads (otherwise the Flash Player may look
conspicuously stalled). We'll add the following features to our
single-movie preloader (shown in Figure 3):
- a text field showing the file size of the movie, in kilobytes
- a text field showing the number of downloaded kilobytes
- a text field showing movie download progress as a percentage
- a preload bar that graphically depicts the movie's download
status
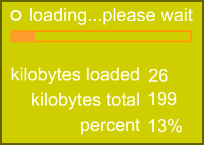
Figure 3: On-screen display of load progress.
We've got some Flash production work to do, and then we need to
update our preload script. We'll start by creating layers on the
main timeline to hold the progress-display content:
-
On the main timeline, create two new layers, one named
bar and the other text fields.
-
At frame 4 of the bar and text fields layers,
add a blank keyframe.
-
At frame 15 of the bar and text fields fields
layers, add a blank keyframe.
Now we'll create the preload bar which is composed of two movie
clips:
-
Create a movie clip symbol named loadBarHousing.
-
In loadBarHousing, create an 8-pixel high, 140-pixel
wide rectangularly shaped outline. (Make sure the rectangle has no
fill.)
-
Select the rectangle in loadBarHousing, then choose
Window-->Panels-->Info.
-
Position the rectangle's left edge on the clip's registration
point by setting its X-coordinate to 0 and its Y-coordinate to
-4.
-
Create a movie clip symbol named loadBar.
-
In loadBar, create an 8-pixel high, 1-pixel wide solid
rectangle. (Make sure the rectangle has no outline).
-
Select the rectangle in loadBar, then choose
Window-->Panels-->Info.
-
Position the rectangle's left edge on the clip's registration
point by setting its X-coordinate to 0 and its Y-coordinate to
-4.
The preload bar clips are done; now place them on the Stage:
-
At frame 4 of the bar layer, place an instance of
loadBarHousing.
-
Name the instance loadBarHousing
(Modify-->Instance).
-
At frame 4 of the bar layer, place an instance of
loadBar.
-
Name the instance loadBar.
-
Select the loadBarHousing and loadBar
instances.
-
On the Align panel (Window-->Panels-->Align) select the
Align Left Edge button (top-left button on the panel) and the
Align Bottom Edge button (top-right button on the
panel).
Finally, create the text fields to hold the kilobyte and
percentage information for the preloader:
-
Select the Text tool.
-
At frame 4 of the text fields layer, drag out a text
box big enough to hold a three-digit number.
-
Choose Text-->Options.
-
In the Text Options panel, change Static Text to Dynamic
Text.
-
In the Text Options panel, select the Include Entire Font
Outline option under Embed Fonts (the [...] button). (Note that in
a production situation you should only embed the characters you
actually use in your text fields--in our case, numbers and the
percent sign).
-
In the Variable text field, type
bytesLoadedOutput.
-
Repeat steps 1 through 6 to create two more text fields, named
bytesTotalOutput and percentOutput.
-
Add regular static text next to each text field describing its
content as follows: Loaded: , Total: ,
Percent: .
Now the fun part--update the code on frame 5 so it reads as
follows (we're only changing the contents of the else
clause, but the code is shown in its entirety): // Specify how many frames to load before playing.
var loadAmount = _totalframes;
// If the required number of frames have finished loading...
if (_framesloaded == loadAmount) {
// ...start the movie
gotoAndPlay("beginMovie");
} else {
// ...otherwise, display the load status
// then go back and check load progress again.
// First, determine the loaded and total kilobytes.
loaded = Math.round(getBytesLoaded() / 1024);
total = Math.round(getBytesTotal() / 1024);
percent = Math.round((loaded/total) * 100);
// Display the loaded kb, total kb, and percentage of
// kb loaded in text fields.
bytesLoadedOutput = loaded;
bytesTotalOutput = total;
percentOutput = percent + "%";
// Set the width of the loadBar to a percentage of
// the loadBarHousing.
loadBar._width = loadBarHousing._width * (percent / 100);
// Now go back and check load progress.
gotoAndPlay("loading");
}
Use the Bandwidth Profiler to test your preloader. The more
content you have on your timeline, the more you'll see the preload
bar working.
Let's examine the changes to our code on frame 5. As before,
we'll only begin the movie if the number of frames loaded matches
our required loadAmount:
if (_framesloaded == loadAmount)
But this time, if the required number of frames hasn't loaded
yet, we'll update our on-screen text fields and preload bar before
sending the playhead back to the loading frame. First we
calculate how many kilobytes have loaded. The
getBytesLoaded() movie clip method tells us how many bytes
have loaded; we divide its return value by 1024 to convert to
kilobytes. To keep our output readable, we round off the result
using Math.round():
loaded = Math.round(getBytesLoaded() / 1024);
Next we calculate how many kilobytes are in the entire movie. We
use the getBytesTotal() method to determine the movie's
size in bytes. Dividing by 1024 and rounding once again gives us
kilobytes:
total = Math.round(getBytesTotal() / 1024);
To compute what percent of the movie had downloaded, we divide
loaded by total and multiply the result by 100.
Using Math.round(), we round the percent to the nearest
integer for display:
percent = Math.round((loaded/total) * 100);
To display our calculated values on screen, we assign
loaded, total, and percent to
corresponding text fields: bytesLoadedOutput = loaded;
bytesTotalOutput = total;
percentOutput = percent + "%"; // Add a % sign for display purposes.
Finally, we set the width of our preload bar. We know that
loadBar should be as wide as loadBarHousing when
our movie is completely loaded. While our movie is still loading,
loadBar's width should be some percentage of
loadBarHousing's width. We've already calculated the
percent of the movie that has loaded, so now we simply set
loadBar's _width property to the appropriate
percent of loadBarHousing's _width property, in
accordance with our percent variable: loadBar._width = loadBarHousing._width * (percent / 100);
With our display updated, we send the movie back to the
loading frame, where it will play and execute our preload
check again: gotoAndPlay("loading");
Reader Exercise: Ideally, while our movie loads we should
distract the user with eye candy, a prelude to a story-line, a game,
or some other toy. See if you can add these things by creating an
entertaining movie clip placed on frame 4. Be careful to make your
distraction small enough to load quickly. If it's too big, you'll
have to preload your preloader!
Multiple-Movie Preloaders
|
|
|
|
By monitoring the
download progress of the main timeline's frames, we can
prevent a movie from playing before adequate content is
available. |
|
|
|
Using loadMovie() we can load external .swf
files into movie clips (called targets) or document levels.
Externally loaded .swf files can be preloaded exactly like
single Flash movies. For example, consider a Flash site with a main
menu that links to three sections: Products, Contact, and About Us.
Each section resides in a separate .swf file:
products.swf, contact.swf, and
aboutus.swf. The site's homepage, menu.swf,
provides buttons that load each section into level 1, as
follows: on (release) {
loadMovie("products.swf", "_level1");
}
To preload, say, the Products section, we place a single-movie
preloader directly on the main timeline of products.swf.
When products.swf is loaded onto level 1, its preloader
will manage the download.
There are times, however, when this approach is inefficient. For
example, suppose we're building a music player that loads multiple
soundtrack .swf files into a single target instance named
host. Rather than create a separate preloader for every
.swf file, we create a single, generic preloader that
manages the download of any file loaded into host.
Let's see how this works. We start with a series of buttons that
load our soundtrack movies into the host clip. The code on
our first button looks like this: on (release) {
host.loadMovie("soundtrack1.swf");
}
When soundtrack1.swf loads into host, we want
host to automatically preload the file. We need to add a
little intelligence to the host clip. When a movie is
loading into the host clip it should call a custom
preload() function to handle the download. We'll use the
following enterFrame movie clip event handler to monitor
the file in host and to call _root.preload() when
necessary: onClipEvent (enterFrame) {
// If the host clip contains an external .swf file...
if (this._url != _root._url) {
// ...call our preload() function, which displays the
// loading .swf file's download progress.
_root.preload(this);
}
}
As each frame passes, the code in host's
enterFrame handler is executed. If host's filename
(this._url) does not match the filename of the main music
player (_root._url), then an external movie must be in
host, so we should run our preload() function. The
preload() function will display load progress and
optionally determine when to play the movie in host.
Before we look at how preload() works, it bears
mentioning that the enterFrame handler just shown is not
the optimal handler to use in this situation. Ideally, we'd call
preload() from a data event, which only executes when data
loads into a movie clip. Unfortunately I've found that the data
event doesn't always fire on fast connections (DSL, Cable, T1). This
is an unverified bug, but it was problematic enough to warrant
moving the preload() call to an enterFrame
handler. I've reported my findings to Macromedia and will post any
resolutions on my
Web site.
Now, back to the preload() function. Skim through it to
get a sense of how it works, then we'll dissect it. function preload (theClip) {
if (!theClip.doneLoading) {
// If we have all the frames, make a
// note that download is complete.
if (theClip._framesloaded > 0
        && theClip._framesloaded == theClip._totalframes) {
theClip.doneLoading = true;
// Optionally start the clip once it's done loading...
// theClip.play();
} else {
// Optionally pause the clip until it's loaded...
// theClip.stop();
}
	// Display loading byte counts in text fields.
	bytesLoadedOutput = theClip.getBytesLoaded();
	bytesTotalOutput = theClip.getBytesTotal();

    	// Strip out the file name of the .swf loading into the
    	// clip and display it in a text field.
    	var lastSlash = theClip._url.lastIndexOf("/");
	clipURLOutput = theClip._url.substring(lastSlash + 1,
             theClip._url.length);

	// Set the width of the loading bar.
	var percentLoaded = (theClip.getBytesLoaded()
             / theClip.getBytesTotal());
	preloadBar._width = preloadBarBG._width * percentLoaded;
}
}
[Editor's note: Lines 20 and 22 were extended to two lines
each to accommodate our Web site's formatting. Throughout this
article, whenever a line of code has been broken up into two lines,
the second line is indented.]
The preload() function takes one parameter,
theClip, which is a reference to the clip to preload
(allowing for the potential of more than one host
clip): function preload (theClip) {
Recall that our preload() function is called once per
frame for as long as an external .swf file resides in
host. It's a waste of time to execute any preloading code
if that file is fully loaded, so preload()'s first job is
to check whether or not theClip has finished loading: if (!theClip.doneLoading) {
The variable doneLoading will be set in theClip
when loading completes; if it doesn't exist, then we need to run our
preloading code. There's not much new in the preloading code itself.
We start by checking whether the number of frames loaded so far
equals the movie's total number of frames, but we also make sure
that there's at least one frame loaded. if (theClip._framesloaded > 0
&& theClip._framesloaded == theClip._totalframes) {
The _framesloaded > 0 safeguard is necessary when
working with movies loaded into target clips because unloading a
clip's contents sets its _totalframes to 0. Hence, on a
very slow connection the comparison _framesloaded ==
_totalframes can return true even when no frames have
yet loaded (because _totalframes and _framesloaded
would both be zero).
When we find that all the frames in theClip have loaded,
we set a flag indicating that we no longer need to run our
preloading code. theClip.doneLoading = true;
At this point we could also play the movie (knowing that it has
safely loaded) by simply executing: theClip.play();
However, in our music player example, we'll let the movie start
playing immediately as soon as it loads, much like an MP3 player, so
there's no need to invoke theClip.play().
If all the frames of theClip have not yet loaded, then
we might stop it from playing prematurely as follows: } else {
theClip.stop();
}
But again, in our example there's no need to stop the movie; we
let it play while the music streams to the Flash player. In any
event, we'll always want to update the progress display text fields
and preload bar. This time we'll display raw bytes rather than
converting to kilobytes as we did in earlier examples: // Display loading byte counts in text fields.
bytesLoadedOutput = theClip.getBytesLoaded();
bytesTotalOutput = theClip.getBytesTotal();
// Strip out the file name of the .swf loading into the
// clip and display it in a text field.
var lastSlash = theClip._url.lastIndexOf("/");
clipURLOutput = theClip._url.substring(lastSlash + 1,
theClip._url.length);
// Set the width of the loading bar.
var percentLoaded = (theClip.getBytesLoaded()
/ theClip.getBytesTotal());
preloadBar._width = preloadBarBG._width * percentLoaded;
Notice that we display the filename of the loading movie by
extracting everything after the last slash in theClip._url.
That's just one of the endless ways to customize a preloader. You
might also fade a clip in as a movie loads by setting its
_alpha property, or increase the volume of a sound, or
calculate how long a file is taking to transfer and estimate the
time remaining. In the source file for our music player example, we
indicate not only how much of the movie loaded, but also how much of
it has played.
Preloading Attached Sounds
|
|
|
|
It is often wise to
preload only part of a movie, allowing the rest to load while
the user is occupied watching the show. |
|
|
|
Now that we've built a preloader for movies loaded into a target
clip, we can easily use it to load attached sounds. An attached
sound is a sound added dynamically to a movie at runtime. To attach
a sound we first export it from the Library (under
Options-->Linkage), then we use an instance of the built-in
Sound class to create, attach, and play the sound.
For example, the following code adds a sound with the Symbol
Linkage Identifier loudBang to the Sound object
bang. The code then starts and stops the bang
sound. // Create a new Sound object scoped to the _root timeline.
bang = new Sound(_root);
// Retrieve the loudBang sound from
// the library and attach it to bang.
bang.attachSound("loudBang");
// Start the bang sound
bang.start();
// Stop just the bang sound
bang.stop("loudBang");
Any sound exported from a movie's library is downloaded in that
movie's first frame, causing a load delay before the movie starts.
In order to avoid the delay, we can place exported sounds in a
separate .swf file that we load into a target clip when
needed (exactly like we loaded movies in our music player example).
For example, suppose we've stored our exported sounds in
linkedSounds.swf. We use our multiple-movie preloader to
load linkedSounds.swf into our host movie clip. When the
file has completely loaded we can safely attach and play its
exported sounds as follows: // Create a new sound with a target of host.
host.bang = new Sound(host);
host.bang.attachSound("loudBang");
host.bang.start();
Notice that the sound being attached must be available in the
Library of the Sound object's specified target (in
our case, host). It's a common mistake to omit the
target argument when constructing Sound objects in
loaded movies. If not supplied, target defaults to
_level0, where the sound cannot be found. For example, the
following attempt to play a sound in host would fail
because the sound loudBang is not available in the library
of _level0: // Create a new sound with an implied target of _level0.
host.bang = new Sound();
// This operation fails..."loudBang" is not in _level10's Library.
host.bang.attachSound("loudBang");
// The sound won't start because it wasn't successfully attached.
// We forgot to specify a target when we constructed host.bang.
host.bang.start();
Preloading XML and Loaded Variables
Loading XML and variables is thoroughly covered in the pages of
ActionScript:
The Definitive Guide, so I won't repeat myself here. The
following executive summary should help you find the relevant
information in either that book or Macromedia's documentation.
To preload an XML document, we use the onLoad() callback
handler of the XML class. The onLoad() handler
automatically executes when Flash finishes loading and parsing an
XML document requested via XML.load() or
XML.sendAndLoad(). In a typical implementation, we invoke
XML.load(), then send the movie to a frame with a loading
message, then wait for the onXML() handler to tell us it's
safe to resume playback (e.g., process the data and display it).
To intercept the raw data loaded by an XML object, we
can alternatively use the undocumented onData() handler. It
is unfortunately not possible in Flash 5 to determine the load
progress of an XML document being retrieved. For more information
see the entries for XML.send(), XML.sendAndLoad(),
XML.onData(), and XML.onLoad() in the Language
Reference of ActionScript: The
Definitive Guide. (The relevant sample chapter is
posted on my Web site). See also Macromedia's Flash
XML primer for more information.
For loaded variables, we also use an event handler to handle
preloading. We start by invoking the loadVariables()
function, which imports variables from a server side script (or text
file) into a movie clip's timeline. While we're waiting for the
variables, we display a loading frame. When the variables arrive,
the clip's data event is triggered, and we carry on with
the movie. A common alternative (which is Flash 4 friendly) to the
data handler is to run repeated checks for the value of our
last loaded variable, and proceed only when that variable becomes
defined. In either case, we unfortunately can't determine the load
progress of our variables; we can only detect when they have fully
loaded.
For a full step-by-step tutorial on loading variables, see
Chapter 17 of ActionScript: The
Definitive Guide. Happy preloading!
Colin Moock has been researching, designing, and
developing for the Web since 1995. Colin served as Webmaster for
SoftQuad Inc. (makers of HoTMetaL PRO) until 1997. He is now a Web
evangelist for ICE Integrated Communications & Entertainment,
where he divides his time between writing about the Web, speaking at
conferences, and creating interactive content for companies like
Sony, Levi's, Nortel, Air Canada, and Hewlett-Packard. Colin's
award-winning Flash work and his renowned support site for Flash
developers have made him a well-known personality in the Flash
developer community. Macromedia has officially recognized his Flash
expertise both on their Web site and by appointing him a member of
their Flash Advisory Board. Colin is a contributing author of The
Flash 4 Bible (1999, IDG Books) and The Flash 5 Bible
(2001, IDG Books). He is the author of O'Reilly's ActionScript: The
Definitive Guide. For more information on Colin Moock, visit his
Web site.
O'Reilly & Associates recently released (May 2001) ActionScript: The
Definitive Guide
Return to: design.oreilly.com
|